The smell of warm butter and hot flour fills your kitchen. You watch through the oven glass, waiting for that magnificent rise. But when you pull the baking tray out and tap the base of a golden scone, you hear a dull, heavy thud instead of a hollow drum.
You break it open, expecting a cloud of steam and a crumbly, feather-light texture. Instead, the middle is tight, heavy, and pale. It feels less like an afternoon tea delicacy and more like an edible paperweight. You followed the recipe precisely, weighing every gram of your self-raising flour. So why does the result sit so heavily in your stomach?
The Architecture of Restraint
The answer lies in a deeply ingrained home-baking habit: the instinct to mix dough until it becomes beautifully smooth. We are taught that lumps are the enemy. From pancake batter to bread dough, a glossy, even consistency is usually the holy grail. But applying this logic to scones is a fatal error.
Think of your scone mixture not as a structure to be built, but as a fragile ecosystem you are briefly visiting. The moment liquid meets self-raising flour, gluten proteins begin to wake up and bond. Aggressive mixing forces these proteins into a tight, elastic web. You are essentially strangling the raising agents before they even reach the heat.
| The Baker Profile | The Specific Benefit of Restraint |
|---|---|
| The Sunday Morning Novice | Eliminates the anxiety of overworking the dough, guaranteeing a soft bite on the very first attempt. |
| The Afternoon Tea Host | Produces dramatically taller scones that split naturally down the middle, ready for clotted cream. |
| The Frustrated Perfectionist | Saves physical effort and washing up, relying on minimal technique rather than vigorous mixing. |
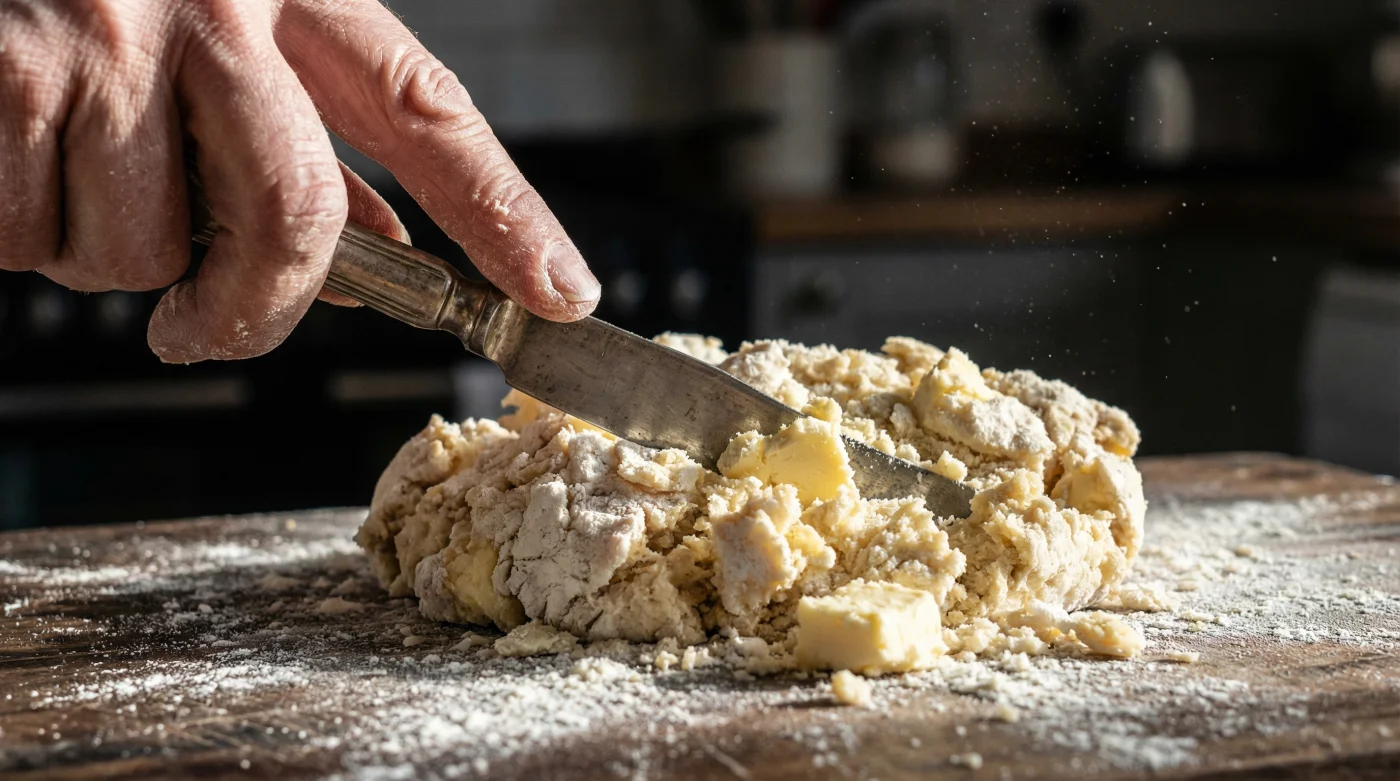
I learned this lesson on a damp Tuesday in Cornwall, standing in the cramped, flour-dusted kitchen of a retired baker named Arthur. He was watching me aggressively knead a mound of sticky dough. He gently nudged me aside, handed me an old, blunt silver butter knife, and offered a piece of wisdom that fundamentally changed how I bake.
‘You are not laying bricks,’ Arthur murmured, cutting through the ragged mixture with the flat blade, the metal scraping lightly against the ceramic bowl. ‘You are just introducing the flour to the milk. Let them shake hands, then leave them be.’
| Baking Metric | Smooth Dough (Over-mixed) | Ragged Dough (Butter Knife Method) |
|---|---|---|
| Gluten Development | High elasticity, tough structure | Minimal, short, tender strands |
| Gas Retention | Trapped tightly, resulting in sideways spread | Expands easily upward, creating massive height |
| Bake Time Efficiency | Requires longer to penetrate the dense centre | Bakes rapidly and evenly through internal air pockets |
| Crumb Texture | Chewy, bread-like, heavy | Crumbly, melting, exceptionally light |
The Butter Knife Method: A Practical Application
To achieve that bakery-window rise, you must actively fight your instinct to tidy the bowl. Start by rubbing your cold, cubed butter into the self-raising flour using just your fingertips. Lift the flour high out of the bowl as you do this, letting it fall back down like snow to incorporate air. You want a mixture that resembles coarse breadcrumbs, but if a few larger flakes of butter remain, leave them. They will melt in the oven and create tiny, delicious pockets of steam.
Now comes the crucial moment. Pour in your milk, perhaps with a squeeze of lemon juice to activate the raising agents further. Do not reach for a wooden spoon. Do not use your hands. Pick up a flat butter knife.
- Tomato ketchup neutralises excessively spicy homemade curries mimicking traditional restaurant bases.
- Scrambled eggs turn unappetisingly rubbery whisking in this cold dairy addition.
- Porridge oats turn incredibly creamy soaking overnight in this mild salty water.
- Self-raising flour creates unpleasantly dense scones ignoring this gentle folding technique.
- Salmon fillets stick stubbornly to frying pans missing this crucial drying step.
Stop while the dough still looks terrible. It should be ragged, lumpy, and slightly dry in patches. Tip this chaotic mess onto a lightly floured work surface. Do not knead. Simply cup your hands around the edges and gently pat it into a thick disc, about an inch high. Those lumps and imperfections are exactly what will catch the air and force the dough upwards when it hits the 200-degree heat.
| Scone Dough Quality Checklist | What to Look For (The Goal) | What to Avoid (The Warning Signs) |
|---|---|---|
| Visual Appearance | Shaggy, uneven, with visible dry streaks of flour. | Perfectly smooth, glossy, uniform colour throughout. |
| Tactile Feel | Crumbly edges, barely holding its structural shape. | Springy, elastic, bounces back when poked with a finger. |
| Bowl Residue | Scraps of dry flour left gathering at the bottom. | The bowl is wiped completely clean by the sticky dough. |
The Bigger Picture of the Bake
There is a profound satisfaction in learning to do less. In a kitchen environment where we are often told to blend, whisk, and beat ingredients into absolute submission, the humble scone asks for your trust instead. By stepping back and allowing the self-raising flour to do exactly what it was milled to do, you remove the stress from the baking process.
When you pull that next batch from the oven, they will look rustic and proud. They will have a jagged, natural split around their waist, practically begging to be prized apart by hand. The crust will be golden and crisp, but the inside will yield with the slightest pressure, offering a texture so light it almost dissolves on the tongue.
You will realise that perfection in baking rarely looks neat in the bowl. It is often found in the deliberate, messy imperfections that we bravely choose to leave alone. Put the wooden spoon away, trust the flat edge of the blade, and let your scones breathe.
‘The secret to a feather-light bake is knowing precisely when to walk away from the bowl.’ – Arthur Penhaligon, Master Baker
Essential Scone Troubleshooting
Why are my scones spreading sideways instead of upwards?
You likely twisted the pastry cutter. Press it straight down and lift it straight up to keep the edges open for a vertical rise.Can I use this butter knife technique with wholemeal flour?
Yes. Wholemeal flour absorbs liquid slightly differently, but the mechanical principle of preventing aggressive gluten formation remains identical.What happens if my dough is too crumbly to pat out?
Add a tiny splash more milk, but do not stir it in. Just press it gently with your hands until the dry crumbs adhere to the main mass.Does the temperature of the butter really matter?
Absolutely. If the butter is warm, it merges with the flour into a dense paste. Cold butter remains distinct, melting only in the oven to create steam pockets.Should I let the dough rest before baking?
No. The moment moisture meets self-raising flour, the chemical reaction begins. Get them onto a baking tray and into a hot oven immediately for maximum height.