You stand at the kitchen counter, staring at a block of cold butter. It is a damp afternoon, the kind where the grey light presses against the windowpane, and the craving for a warm, fresh bake sits heavily in the air. The standard routine dictates that you wait, leaving the foil-wrapped brick near the radiator until it yields to the back of a wooden spoon.
But waiting for butter to soften feels like an unnecessary compromise. You are accustomed to creaming cold fat with caster sugar, beating air into the mixture until it turns pale and fluffy. It works, certainly, but it leaves an entire spectrum of flavour completely untouched in the mixing bowl.
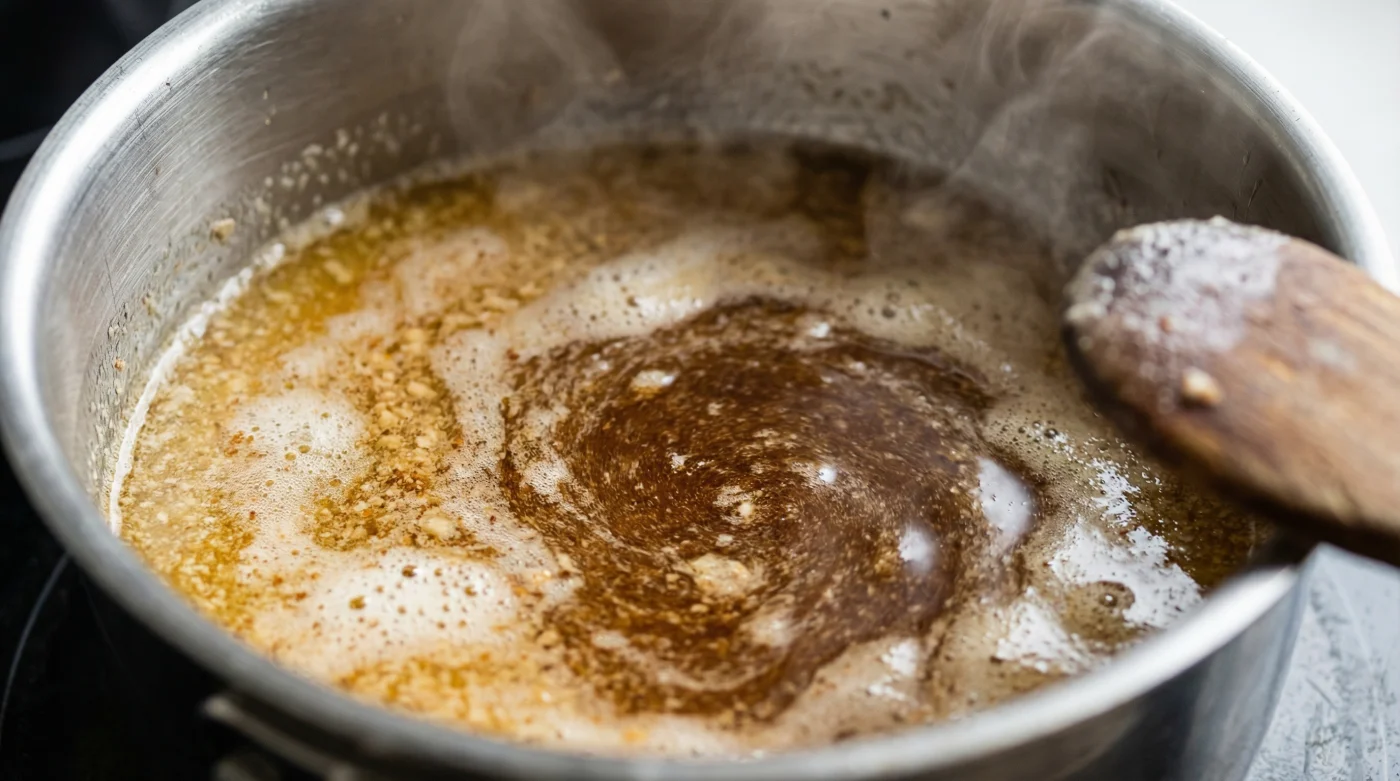
Imagine instead dropping that cold slab straight into a stainless steel saucepan over a medium flame. The kitchen quickly fills with the sound of snapping and popping as the water content cooks off. Within moments, the scent shifts from simple dairy to a rich, heady aroma reminiscent of toasted hazelnuts and dark caramel.
This simple stovetop intervention changes the chemical structure of your bake entirely. By swapping the familiar creaming method for a brief, attentive session over the hob, you introduce an intense, nutty baseline that cuts right through the overt sweetness of a standard chocolate chip dough.
The Alchemy of Heat and Patience
Baking is often treated as a rigid set of instructions, a list to be followed without deviation. Yet, when you look closely at butter, it is not merely a baking lubricant; it is an emulsion of butterfat, water, and milk solids.
When you apply heat, you are separating these three components. The water boils away, leaving the fat to fry the tiny milk solids that sink to the bottom. It is a delicate process of managed caramelisation, demanding your full attention and a constant, rhythmic swirling of the pan.
Elias Thorne, a 42-year-old pastry chef working in a cramped but beloved Soho bakery, considers this step entirely non-negotiable. “You do not watch the butter to see when it is done,” Elias insists, standing over a bubbling vat of golden liquid. “You listen to it. The heavy crackle of evaporating water will suddenly stop, shifting into a soft, rapid hiss. That is the exact second the milk solids begin to toast. You pull it off the heat the moment it smells like a Sunday roast nut-roast, before the silence brings a burnt bitterness.”
His method relies heavily on auditory cues over visual checks. It transforms a mundane chore into an act of sensory engagement, forcing you to remain present at the stove rather than wandering off to check your phone while the mixer runs.
Tailoring the Toasted Profile
Not all batters require the exact same treatment. Once you understand the base mechanic, you can adjust the depth of the toast to suit the specific sugar and chocolate you plan to use.
For the Dark Chocolate Purist: If you are folding in bitter, 70% cocoa chunks, take the butter to a deep amber. The almost-savoury roasted notes of the dark milk solids will harmonise with the astringency of the cacao, creating an incredibly grown-up flavour profile that lingers on the palate.
- Shortcrust pastry shrinks violently during baking missing this overnight rest.
- Victoria sponge cakes sink instantly skipping this vital oven technique.
- Traditional scones turn incredibly dense ignoring this crucial milk temperature.
- Waitrose bakery removes legendary fresh sourdough triggering massive shopper outrage.
- Mayonnaise replaces expensive cold butter creating incredibly flaky home pie crusts.
For the Salty-Sweet Fanatic: Consider tossing a sprig of thyme or a cracked cardamom pod into the butter during the final thirty seconds of toasting. The fat will absorb the volatile oils, infusing the finished bake with a startling, aromatic complexity that pairs beautifully with a heavy pinch of Maldon sea salt scattered across the top before cooling.
The One-Minute Masterclass in Swirling
Achieving this transformation is not difficult, but it requires mindful execution. You cannot walk away, and you must trust the process as the liquid moves through its distinct phases.
Gather your tools before you turn on the gas. Preparation is your best defence against burning, so ensure you have a light-coloured saucepan to accurately gauge the colour changes, alongside a heat-proof silicone spatula.
- The Melt: Cut 200g of unsalted butter into even cubes. Melt them over a medium heat, stirring occasionally to ensure even distribution.
- The Sizzle: As the butter boils, it will spit violently. This is the 15% water content evaporating. Keep the pan moving with a gentle, constant swirling motion.
- The Foam: The liquid will suddenly rise into a thick, white foam, obscuring the bottom of the pan. Switch to your spatula, scraping the base continuously to prevent sticking.
- The Turn: The foam will subside slightly, and tiny brown specks will appear at the bottom. The scent in the kitchen will instantly turn intensely nutty.
- The Halt: Immediately pour the entire contents—scraping every last toasted speck—into a cold, heat-proof bowl to arrest the cooking process. Let it cool for twenty minutes before adding your sugars.
Beyond the Biscuit Tin
Mastering this singular technique does more than just improve your weekend baking output. It recalibrates your approach to everyday ingredients, proving that extraordinary results often hide within the most ordinary items sitting quietly in the fridge door.
There is a profound peace of mind found in understanding the mechanics of your food. When you know exactly how the fat behaves in the pan, you are no longer blindly hoping for a good result; you are actively designing the precise texture and taste you desire.
You take a bite of the finished product, feeling the crisp, caramelised edge give way to a dense, chewy centre. The flavour lingers, rich and complex, miles away from the flat sweetness of a standard batch that relies on cold creaming.
It is a quiet victory, wrapped in melting chocolate and toasted dairy. You have taken just ten extra minutes on a damp afternoon to create something distinctly yours, proving that a little attentive heat changes absolutely everything.
“The difference between a passable bake and a memorable one is almost always found in how you treat the fat before the flour even touches the bowl.”
| Key Point | Detail | Added Value for the Reader |
|---|---|---|
| Water Evaporation | Boiling the butter removes its 15% water content entirely. | Creates a chewier, denser dough structure less prone to spreading flat in the oven. |
| Maillard Reaction | Milk solids toast at the bottom of the pan at roughly 120°C. | Introduces a complex, nutty, caramel flavour that standard sugar alone cannot provide. |
| Thermal Arrest | Transferring the hot liquid immediately to a cold bowl. | Prevents the delicate milk solids from turning black and rendering the batch bitter. |
Frequently Asked Questions
Does browned butter change the texture of the bake?
Yes. Because you boil off the inherent water content, the resulting dough has less moisture. This yields a chewier centre and crispier edges, though you may occasionally need to add a small splash of milk if the dough feels too crumbly.Can I use salted butter for this method?
It is highly recommended to use unsalted. Salted butter foams far more aggressively, making it difficult to see the milk solids browning, and the salt concentrates as the water evaporates, risking an overly salty finish.How long should I let it cool before mixing?
Aim for about twenty to thirty minutes at room temperature. It should be liquid but no longer hot to the touch, ensuring it easily dissolves the sugars without accidentally scrambling your eggs.Why did my butter turn black?
The window between perfectly toasted and burnt is roughly fifteen seconds. If you leave the pan on the residual heat of the hob, the milk solids will continue to cook and turn bitter. Always transfer to a cool bowl immediately.Can I make a batch in advance?
Absolutely. You can toast a large quantity of butter, let it solidify in the fridge, and use it exactly as you would normal block butter for weeks to come, bringing instant depth to any recipe.