You stand at the kitchen counter, armed with a heavy rolling pin and a clear plastic bag of digestive biscuits. The rhythmic thud of wood against biscuit creates a satisfyingly coarse sand, smelling faintly of toasted wheat and quiet weekend baking. You melt the butter in a pan, stir it into the crumbs, and press the gritty paste into your springform tin, trusting the cold air of the fridge to do the heavy lifting.
Yet, hours later, when the tin is unclipped and the serving knife descends, the illusion shatters. The edge collapses, dropping a dry, disappointing avalanche onto the cake stand, leaving your beautifully set topping perched on a fractured ruin.
Most domestic recipes gloss over this moment entirely, treating the base as a mere afterthought—a simple, crude equation of crushed biscuits and liquid fat. We are told to press harder, to use the flat bottom of a drinking glass, or to chill the tin for twice as long, hoping sheer force and dropping temperatures will magically hold everything together.
But mechanical pressure is entirely the wrong approach when you want a flawless, reliable slice. To create a base that cuts cleanly and snaps under a pastry fork, you must alter the molecular structure of the mixture using a remarkably quick burst of targeted heat.
Shifting from Pressure to Fusion
Think of building a dry stone wall versus laying bricks with wet mortar. When you just mix melted butter into cold crumbs and press them down, you are simply wedging loose particles together by force. As soon as the fat solidifies in the fridge, it acts like a weak, brittle glue that shatters the moment a steel blade breaks the surface tension.
The secret lies in creating a true structural locking effect before the chilling stage begins. By microwaving the combined biscuit and butter mixture before pressing it into the tin, you gently fry the wheat starches and melt the butter proteins into the crumb itself.
The liquid fat no longer just sits awkwardly on the outside of the biscuit dust. Instead, it permeates the baked grain, swelling the starches and creating a unified, homogenous dough that sets with absolute, waterproof rigidity once it cools.
I learned this specific method entirely by accident while observing Marcus, a 48-year-old pastry chef running a frantic seaside cafe kitchen in Cornwall. During a brutally busy bank holiday weekend, his main commercial ovens failed, leaving him scrambling to prep twenty desserts using only a standard domestic microwave and a temperamental display fridge.
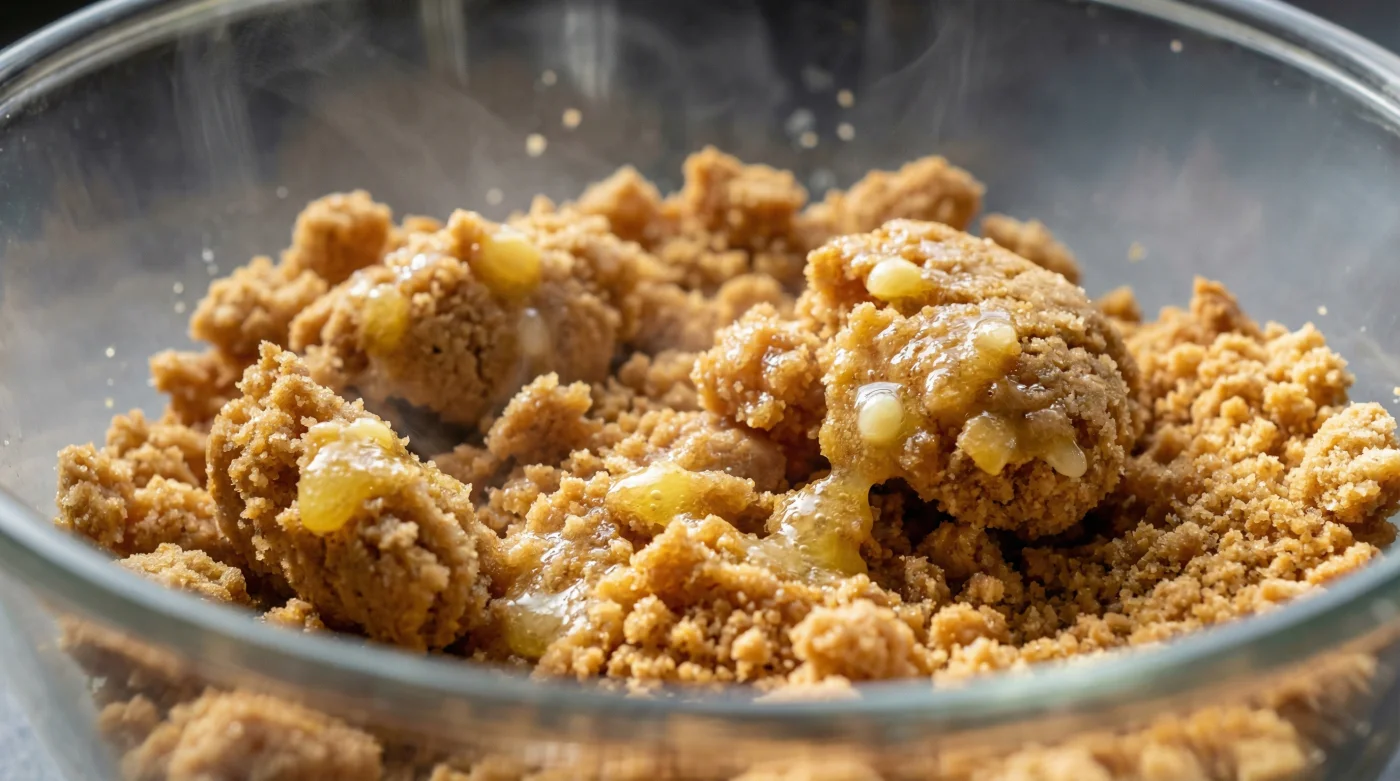
Watching him work was a masterclass in calm, unbothered efficiency under pressure. Instead of chilling his bases immediately, he blasted the large glass bowls of buttery crumb in the microwave until they visibly steamed and released an intense, nutty aroma.
He explained that the rapid, penetrating heat forces the dairy solids to bind directly with the biscuit, turning a fragile, crumbly crust into a reliable platform that never turns soggy, even beneath a thick, dense cream cheese filling.
Adjusting the Base for Your Palate
Not every dessert demands the exact same foundational flavour. Once you understand how heat permanently binds the ingredients, you can confidently manipulate the flavour profile to suit whoever happens to be sitting around your dining table.
For the classic purist, the traditional ratio remains largely untouched: standard digestive biscuits and unsalted block butter. However, because the microwave technique naturally amplifies the toasted notes of the wheat, you will likely need slightly less added sugar than your grandmother’s handwritten recipe suggests.
If you are serving someone who finds modern desserts overly rich and cloying, consider the savoury leaner approach. Swap ten percent of the biscuit weight for crushed salted pretzels or plain water crackers, and mix in a heavy pinch of flaky sea salt.
For the dedicated chocoholic, substituting dark chocolate digestives introduces a completely new chemical variable. Chocolate contains cocoa butter, which melts and seizes much faster than regular dairy fat, meaning you must reduce the heating time by at least five seconds to prevent the mixture turning into an unworkable, greasy paste.
The Ten-Second Binding Technique
Executing this tactile modification requires minimal physical effort, but it demands your absolute, undivided attention. The dividing line between warm, binding milk proteins and bitter, burnt butter is measured in mere seconds.
- Active dry yeast dies instantly encountering standard hot tap water.
- Vanilla bean pods deliver double flavour discarding the standard scraping technique.
- Royal icing turns intensely brittle missing this vital liquid glucose drop.
- Stale bread crusts revive instantly undergoing this brief damp microwave blast.
- Caster sugar destroys delicate meringue peaks encountering this microscopic yolk drop.
- Transfer the damp crumb mixture into a wide, microwave-safe bowl to ensure an even distribution of heat.
- Microwave on full power (standard 800W) for exactly fifteen seconds, then remove the bowl and stir vigorously, scraping the sides to distribute the hot fat.
- Return the bowl to the microwave for another ten to fifteen seconds until the mixture begins to smell distinctly nutty and feels hot against the back of your hand.
- Tip it immediately into your lined tin and press firmly with the back of a metal spoon.
Tactical Toolkit: Keep a digital probe thermometer nearby if you are unsure; you are aiming for a mixture temperature of roughly 65 degrees Celsius. Always rely on a flexible silicone spatula to scrape every last drop of the valuable binding fat from the bowl into your tin, and ensure your tin is fully lined with baking parchment before you begin heating.
When you finally press the warm mixture into the prepared tin, you will notice immediately that the proteins are highly active, smoothing out beautifully into an unbroken, glossy surface that requires very little force to pack tightly together.
A Foundation That Quietly Supports
There is a distinct, quiet satisfaction in serving a homemade dessert that behaves exactly as you intended it to. You spend hours perfecting the silken texture of the topping, worrying over the precise setting point and visual appeal.
The base of a dessert is its silent partner, doing the quiet work of structural support and ensuring the cream should tremble slightly when served to your expectant guests. It makes absolutely no sense to let the bottom layer let you down at the very last hurdle.
When you take the time to prepare it properly, shifting your focus from crude mechanical force to smart temperature control, you grant yourself total peace of mind for the moment the dessert hits the dining table.
When you bring the heavy knife through the filling and hit the base, you will feel the difference immediately in your hands. The blade glides through, and the crust yields without shattering, holding its sharp, architectural edge all the way from the tin to the serving plate.
The true test of a baker isn’t found in the intricate piping of the icing, but in the unseen structural integrity of the base.
| Technique | The Physical Detail | Added Value for the Reader |
|---|---|---|
| Cold Pressing | Forces brittle fat around cold crumb particles | High risk of crumbling and mess upon slicing |
| The Microwave Bind | Melts and fuses butter proteins deeply into wheat starches | Flawless, sharp slices that never collapse on the plate |
| Adding Extra Butter | Saturates the crumb to artificially compensate for loose texture | Results in a greasy, heavy base that ruins the palate |
Frequently Asked Questions
Can I use margarine instead of block butter?
It is strongly advised against. Margarine has a significantly higher water content, which creates steam in the microwave and results in a soggy, rather than structurally locked, base.
How long should the base chill after microwaving?
Place the freshly pressed base into the fridge for at least 45 minutes before adding any liquid filling to ensure the newly fused milk proteins have fully solidified.
Will this work with gluten-free digestives?
Yes, though gluten-free biscuits lack standard wheat elasticity. You may need an additional five seconds in the microwave to encourage a proper, lasting bind.
What if my mixture starts to actively bubble?
You have overheated the butter and the dairy solids are frying. Stop immediately, stir vigorously to cool the mixture down, and press it into your tin without any further heating.
Do I still need to use a heavy glass to press the crumbs?
A light, even press with the back of a metal spoon is now entirely sufficient. The heat has already done the structural work; you are simply smoothing the surface level.