Imagine the sputtering chaos of a Sunday morning fry-up. You stand before the hob, wielding tongs like a shield against aggressive spits of molten grease. You drop a premium dry-cured back rasher into a sizzling hot pan, anticipating that perfect cafe-style finish. Instead, the meat seizes, buckling into an ugly, charred saddle with a desperately flabby, undercooked strip of fat running down its edge.
This is the morning ritual we have accepted as standard. We endure the burns on our forearms and the smoke alarm’s shrill judgment, believing that fierce heat is the only way to achieve a proper crunch. But this culinary violence is exactly why your breakfast feels like a battleground rather than a restorative weekend ritual.
The professional reality is entirely different. Walk into the kitchen of any high-end brasserie before the breakfast rush, and you won’t hear the deafening crackle of burning pork fat. You will hear a gentle, rhythmic bubbling. They understand something fundamental about the structure of cured meat that we often forget in our rush to plate up.
You are about to discard the most stubborn frying myth of all. By deliberately introducing something entirely counterintuitive—a splash of cold tap water—you will tame the heat, render the fat completely, and produce rashers that sit flush against the plate, brittle and beautiful.
The Science of the Cold Submersion
We naturally treat cooking bacon like searing a steak, but it is actually an exercise in rendering. When you throw cold pork into a fiercely hot frying pan, the lean muscle fibres contract violently while the fat struggles to break down. This uneven panic is what causes the aggressive curling. The meat effectively cooks before the thick band of fat has a chance to melt.
Adding cold water to the cold pan creates a gentle, highly effective thermal buffer. The water boils away first, keeping the temperature around the boiling point—hot enough to cook the meat gently, but perfectly calibrated to coax fat from cellular structures without seizing the muscle.
By the time the water has completely evaporated, the rashers are sitting in a generous pool of their own liquid gold. The pan temperature then naturally rises, and the bacon effectively fries in its own rendered fat. The flaw of putting water in hot oil—usually a recipe for domestic disaster—becomes your greatest advantage when introduced right at the cold start.
A Bristol Kitchen Secret
Arthur Pendelton, a 62-year-old diner chef working in a busy Bristol cafe, processes over forty pounds of dry-cured pork every weekend. If his rashers curled, they wouldn’t stack neatly into his signature sourdough baps. Years ago, tired of pressing meat down with heavy cast-iron weights, he noticed a junior prep cook accidentally spilling a jug of water into a cold roasting tin of streaky rashers.
Rather than throwing the batch away, they placed it on the heat. Arthur watched as the water clouded with fat, bubbled away into steam, and left behind impossibly flat, uniform strips of mahogany meat. It was a complete paradigm shift. He realised that aggressive heat ruins consistency. The cold water method didn’t just save his forearms from grease burns; it allowed him to standardise the perfect crispness across hundreds of morning covers.
Adapting the Method to Your Cut
Not all pork is created equal. The way you apply this method depends entirely on what you have brought home from the butcher or supermarket. Adjusting for the specific cut ensures you never overcook the delicate variations in thickness and fat ratio.
For the dry-cured purist handling thick-cut back bacon, the cornerstone of a proper British breakfast, you need just enough water to coat the bottom of the pan—about three tablespoons. This prevents lean meat toughening while the rind renders down to an edible crunch.
- Canned chickpeas turn perfectly crunchy roasting after this salad spinner trick.
- Yorkshire puddings achieve towering oven heights abandoning room temperature batter entirely.
- Cheap balsamic vinegar replicates premium aged bottles simmering with dark soy.
- Minced beef develops intense steakhouse flavours mixing with baking soda.
- French macarons achieve perfectly flawless feet resting inside steamy ovens.
If you are feeding a crowd, dragging out multiple frying pans is a nightmare. Apply the exact same logic to a cold baking tray in the oven. Lay the meat out, add a small splash of water to the tray, and start in a cold oven set to 180°C. The gradual heating environment mirrors the stovetop effect beautifully.
Mindful Application
Mastering this kitchen fix requires stepping away from the chaos of high heat. You are no longer fighting the ingredients; you are guiding a specific thermal process. Set your intentions before you reach for the tongs.
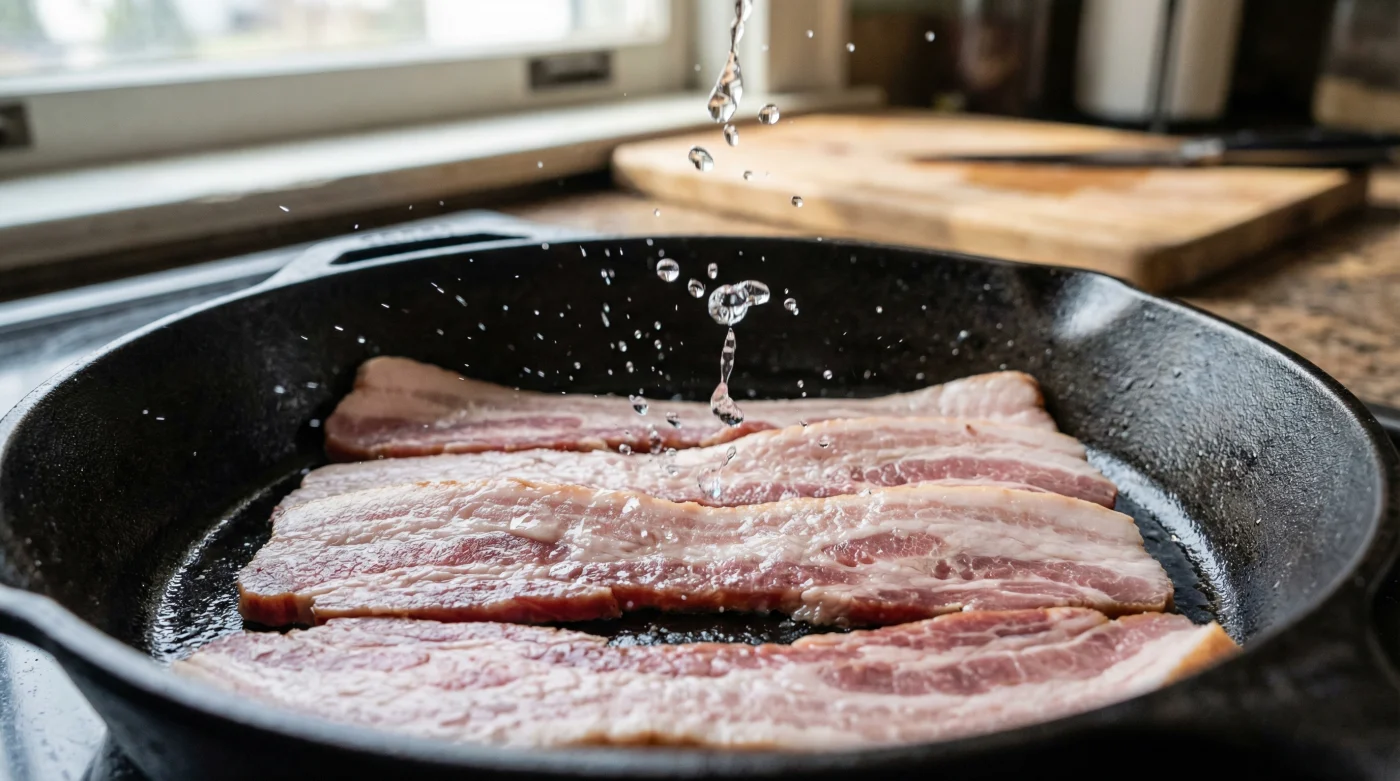
- Place your cold rashers directly into a cold, dry frying pan, ensuring they sit relatively flat.
- Pour in enough cold tap water to just submerge the base of the cuts.
- Set the hob to a medium heat and wait for the liquid to turn opaque.
- Let the water simmer vigorously without flipping the meat.
- Listen for the distinct shift in sound from a wet boil to a sharp sizzle, indicating the fat is now frying the meat.
Allow the water to come to a vigorous simmer. Do not touch or flip the meat during this phase. Wait for the sound to change. The bubbling water will transition into a distinct, sharp frying sizzle as the moisture evaporates and the rendering fat takes over.
Flip the rashers once, letting them crisp in the liquid fat for a final sixty to ninety seconds until they reach your desired finish. This slow, deliberate rhythm removes all the guesswork, meaning you no longer fight spitting hot grease.
The Bigger Picture
Changing how you cook a simple rasher might seem like a trivial domestic adjustment, but it fundamentally alters the atmosphere of your kitchen. When we stop relying on aggressive heat to bully our ingredients into submission, we find a much calmer, more predictable way of operating.
The frantic, smoke-filled scramble of a Sunday fry-up is replaced by a quiet, controlled simmer. You gain back the five minutes usually spent fighting curled meat to actually butter the toast, pour the tea, and reclaim your morning peace.
Cooking, at its core, is just applied physics. By understanding that fat needs time to melt before meat needs heat to crisp, you remove the stress from the equation. The flat, beautifully crisp result on your plate is simply the physical evidence of working with the ingredient’s nature, rather than against it.
“Heat does not equal crispness; time and rendered fat equal crispness. Water buys you the time you need.” – Arthur Pendelton
| Key Point | Detail | Added Value for the Reader |
|---|---|---|
| Standard Frying | High heat, dry pan, fast cooking. | Often results in burnt edges, a smoke-filled kitchen, and curled, chewy fat. |
| Cold Water Method | Cold start, tap water, medium heat. | Guarantees perfectly flat rashers, beautifully rendered fat, and zero grease burns. |
| Oven Submersion | Cold tray, splash of water, 180°C start. | Ideal for stress-free batch cooking without having to stand over the hot hob. |
Frequently Asked Questions
Will the water make the meat soggy?
Not at all. The water evaporates entirely before the frying stage begins, leaving only rendered fat to flawlessly crisp the meat.Can I use this method for smoked bacon?
Yes. It works beautifully for smoked cuts, helping to mellow any overly aggressive artificial smoke notes while retaining the woodsy foundation.Do I need to cover the pan with a lid?
Leave the pan uncovered. Trapping the steam will inadvertently steam the meat, rather than allowing the water to evaporate to begin the frying phase.How much water is too much?
For thin streaky cuts, fully submerge them. For thick back cuts, just a few tablespoons to coat the pan base is perfectly sufficient.Does this work on induction hobs?
Absolutely. Induction provides excellent temperature control, allowing the water to come to a simmer steadily without scorching the edges before the render begins.