The kitchen smells of raw vanilla and softened butter. You have spent the last half-hour carefully folding flour into whipped eggs, protecting the delicate air bubbles like fragile glass. The ceramic bowl hums against the countertop as you scrape the final remnants of a rich, liquid cheesecake batter into your springform cake tin. Every tool is in its place, and the afternoon stretches out ahead of you, calm and predictable.
You snap the metal clasp shut, hearing that reassuring metallic click as the collar tightens around the flat base. It feels entirely secure. You slide the tin onto the middle shelf of a pre-heated oven, close the heavy glass door, and set the mechanical timer. For a few brief minutes, everything is perfectly domestic, quiet, and exactly as it should be.
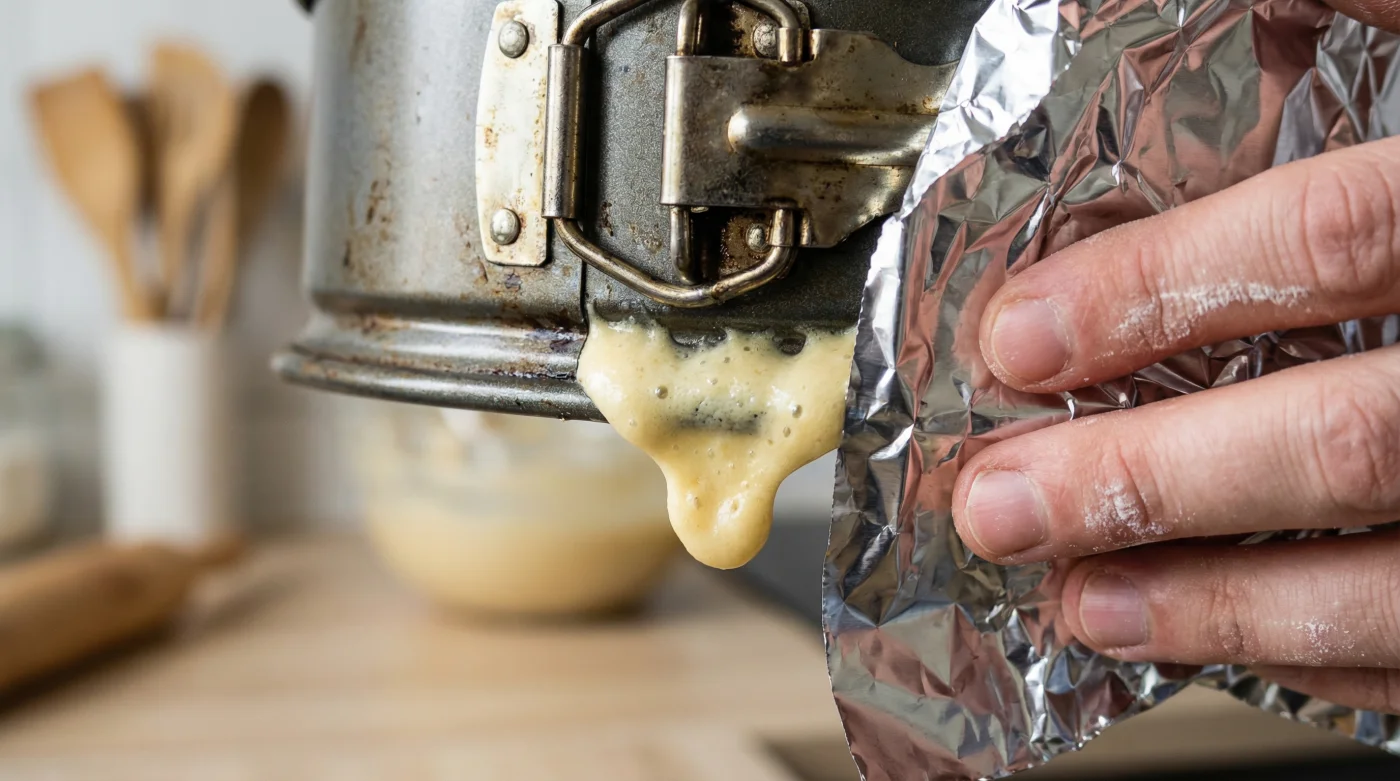
Then, the atmosphere in the room shifts. The sweet, comforting aroma of baking sugar and dairy curdles into the harsh, acrid smoke of burnt carbon. You peer through the oven glass and see a thin, relentless golden puddle weeping from the seam of your tin, pooling directly on the scorching oven floor. Trusting that single metal hinge has just cost you the base of your bake, your peace of mind, and an hour of intensive oven scrubbing.
The truth is, the hinge is merely a mechanical guide, not a structural promise. Metal warps under heat, expanding just enough in the oven to betray the perfect circle. The solution is not throwing away your equipment to buy a more expensive tin, but applying a tactile modification that takes less than thirty seconds to execute.
The Perspective Shift: The Clasp is a Handshake, Not a Contract
We routinely expect our baking equipment to act as an impenetrable fortress right out of the cupboard. When you lock a springform tin, the spring tension creates an illusion of an airtight seal. But you must start thinking of that metal clasp as a polite handshake between two pieces of aluminium, rather than a watertight contract. The flat base and the vertical collar might sit completely flush against one another at room temperature, but once exposed to the fierce, circulating heat of gas mark 4, they begin to breathe, flex, and shift independently.
This is precisely where the domestic illusion breaks down entirely. Batter finds the weakness, slipping quietly through the microscopic, invisible gaps where the hot metal expands. A springform tin is fundamentally engineered for one primary purpose: the easy, damage-free release of a delicate sponge. It is not designed to hold back a flood of heavy liquid batter, nor is it built to stand firm when submerged in a roasting tin of boiling water. To force the tin to do both of these things flawlessly, you must provide it with an external, protective skin.
Sarah Jenkins, a 42-year-old pastry chef running a bustling independent bakery in Bath, learned this structural flaw the hard way. During her very first Christmas trading season, a massive batch of fifty baked Basque cheesecakes began weeping simultaneously into her pristine industrial ovens. Thick smoke filled the shop floor, choking the staff and forcing them to open the front doors to the freezing December air. The financial loss of the wasted cream cheese, vanilla pods, and organic eggs was brutal. From that afternoon onwards, Sarah introduced a mandatory ‘swaddling’ rule for her apprentices. Every springform tin gets double-wrapped in heavy-duty aluminium foil before a single drop of batter touches the metal. It is an unglamorous, highly manual step that entirely eradicated her leakage rates and saved her thousands of pounds over the years.
Deep Segmentation: Matching the Method to the Bake
Not all cake batters demand the exact same level of fortification. You must tailor your foil wrapping technique to the specific vulnerability of the recipe you are working with on the day. The viscosity dictates the defence.
For the Heavy Sponges
For thick, highly structural batters like a traditional Victoria sponge, a dense carrot cake, or a rich fruitcake, the risk of a massive leak is relatively minimal. These heavy mixtures barely move once they hit the cold tin. However, butter can still melt and seep out before the flour sets. A single sheet of standard kitchen foil, pulled taut around the outer base and scrunched slightly up the sides, is sufficient insurance against a faulty hinge. It acts as a safety net, catching any rogue drops of hot fat.
For the Liquid Tarts and Cheesecakes
Here, the liquid nature of the unbaked mixture is your primary enemy. Cheesecake bases weep butter, and liquid custard fillings will actively seek out the quickest route of escape. For these delicate bakes, you require wide, heavy-duty roasting foil. Standard kitchen foil is far too thin and fragile; the slightest tear on the sharp metal clasp will breach the hull. Two large, overlapping squares forming a cross beneath the tin, folded firmly up the outer walls, create a completely impenetrable barrier that keeps the filling exactly where it belongs.
For the Water Bath Bake
- Baking parchment lies completely flat inside metal trays adopting this crinkle.
- Dry yeast achieves rapid bakery-style rising absorbing microscopic ginger powder pinches.
- Cocoa powder yields intensely fudgy brownies skipping traditional raw flour mixtures.
- Icing sugar creates perfect glossy frostings bypassing standard aggressive mechanical whipping.
- Sweet potatoes achieve blistered skins skipping standard fork piercing routines.
Mindful Application: The Thirty-Second Fortification
Do not rush the wrapping process. Treat it as a deliberate, grounding moment of preparation before the messy chaos of mixing begins. A sloppy, loose wrap is entirely as useless as no wrap at all. Smooth the metal flat.
To execute this correctly, you need a very specific tactical approach. Gather your heavy-duty aluminium foil, ensure you have a clean, flat work surface, and prepare to use the pads of your thumbs to securely seal the metal edges.
- Measure generously: Tear off two pieces of heavy-duty foil. They must be at least six inches wider than the base of your tin on all sides.
- Create the cross: Lay the first sheet flat on your counter, and place the second sheet directly over it horizontally to form a cross shape.
- Position the tin: Sit your fully assembled, empty springform tin squarely in the dead centre of the foil cross.
- The upward fold: Bring the edges of the foil up against the outer walls of the tin, one side at a time, pressing firmly.
- Burnish the seam: Use your thumbs to press the foil hard into the bottom edge where the base meets the collar, creating a sharp, tight 90-degree angle.
Fold the excess foil back down over itself, crimping it neatly against the outer wall below the metal clasp. Keep the rim clear. Do not let the foil climb over the top edge of the tin, as a ragged foil edge will interfere with the rising heat of the oven and could catch the top of your rising sponge.
Take five seconds to pick the tin up and inspect the bottom. If you see a tear, start again. A single microscopic puncture defeats the entire purpose of the exercise, giving the batter exactly the escape route it needs.
The Bigger Picture: Baking Without Fear
We often turn to baking to find a quiet sense of control and calm in our lives, to create something deeply tangible and nourishing with our own two hands. When our trusted equipment fails us, it introduces panic and frustration into a physical space that should feel entirely restorative. You remove the anxiety by taking this simple preventative step, shifting your internal mindset from hoping for the best to actively guaranteeing the outcome. You can walk away from the oven door, sip a cup of tea, and entirely trust the silent baking process.
Recognising that a springform tin is an imperfect, shifting tool allows you to step in and take full control of its mechanical flaws. You are no longer reliant on the frail promise of a tiny metal clasp; you have engineered a flawless, custom seal yourself. The end result is not just a perfectly baked, towering cheesecake with a crisp base, but a truly spotless oven floor and an undisturbed, peaceful Sunday afternoon.
‘The secret to a perfect bake doesn’t lie in the mixing bowl, but in the quiet, unseen preparations that ensure your ingredients are held safely in the fire.’
| Key Point | Detail | Added Value for the Reader |
|---|---|---|
| Heavy-Duty Foil | Use thick, roasting-grade aluminium foil rather than standard kitchen foil. | Prevents accidental tears against the sharp metal clasp, ensuring a genuinely waterproof seal. |
| The Cross Method | Layer two overlapping sheets in a cross formation before placing the tin in the centre. | Eliminates open seams at the base, completely blocking water ingress during a bain-marie bake. |
| Thumb Burnishing | Press the foil tightly into the 90-degree angle where the base meets the collar. | Reduces air pockets between the foil and the tin, allowing for entirely even heat distribution. |
Frequently Asked Questions
Can I use baking parchment instead of aluminium foil?
Baking parchment is brilliant for lining the inside to prevent sticking, but it is not waterproof enough to create an external seal. You must use foil on the outside.Should I wrap the tin before or after greasing the inside?
Always wrap the exterior of the tin while it is completely clean and dry, before you grease the interior. Butter on the outside of the tin will prevent the foil from gripping the metal tightly.Will the extra layer of foil alter the baking time?
Heavy-duty foil reflects a tiny amount of heat, but tightly wrapped foil acts as a second skin. It will not noticeably change your baking time, though it will ensure the heat applies evenly to the base.How do I stop the foil from scratching my non-stick roasting tin during a water bath?
Ensure you fold the foil edges upwards securely and smooth the bottom flat with your hands. A perfectly flat foil base will sit flush and softly against your roasting tin.Does this method work for loose-bottomed tart tins as well?
Absolutely. Loose-bottomed tins are even more prone to leaking liquid fillings like quiche or custard. The double-wrap foil method will secure them just as effectively as a springform clasp.