The Sunday kitchen carries a specific tension just before the meal is served. The scent of roasted fat and thyme fills the room, the resting meat glistens on the carving board, and the heavy knife is drawn. But as you press the blade down onto the pork belly, instead of a clean, resounding snap, the skin merely squashes. The crackling is leathery, requiring a sawing motion that ruins the careful presentation you worked so hard to achieve.
You have likely followed the traditional, unquestioned advice handed down through generations of home cooks. You pat the rind dry with endless sheets of kitchen paper, leave it uncovered in the coldest part of the fridge overnight, and rub it with coarse salt until your fingers sting. You treat moisture like an absolute enemy, believing that a bone-dry start is the only way to a crisp finish.
Yet, across the pass in high-end kitchens, chefs are deliberately ignoring this rule. The secret to a finish that rivals a Michelin-starred carvery isn’t endless drying; it involves a seemingly counterintuitive shock of boiling water.
We are talking about a specific structural reaction here. By scalding the skin before roasting, you trigger a chemical change that bridges the gap between a Sunday roast that tastes acceptable and a visually striking plate that commands silence when brought to the dining table.
The Paradox of the Scald
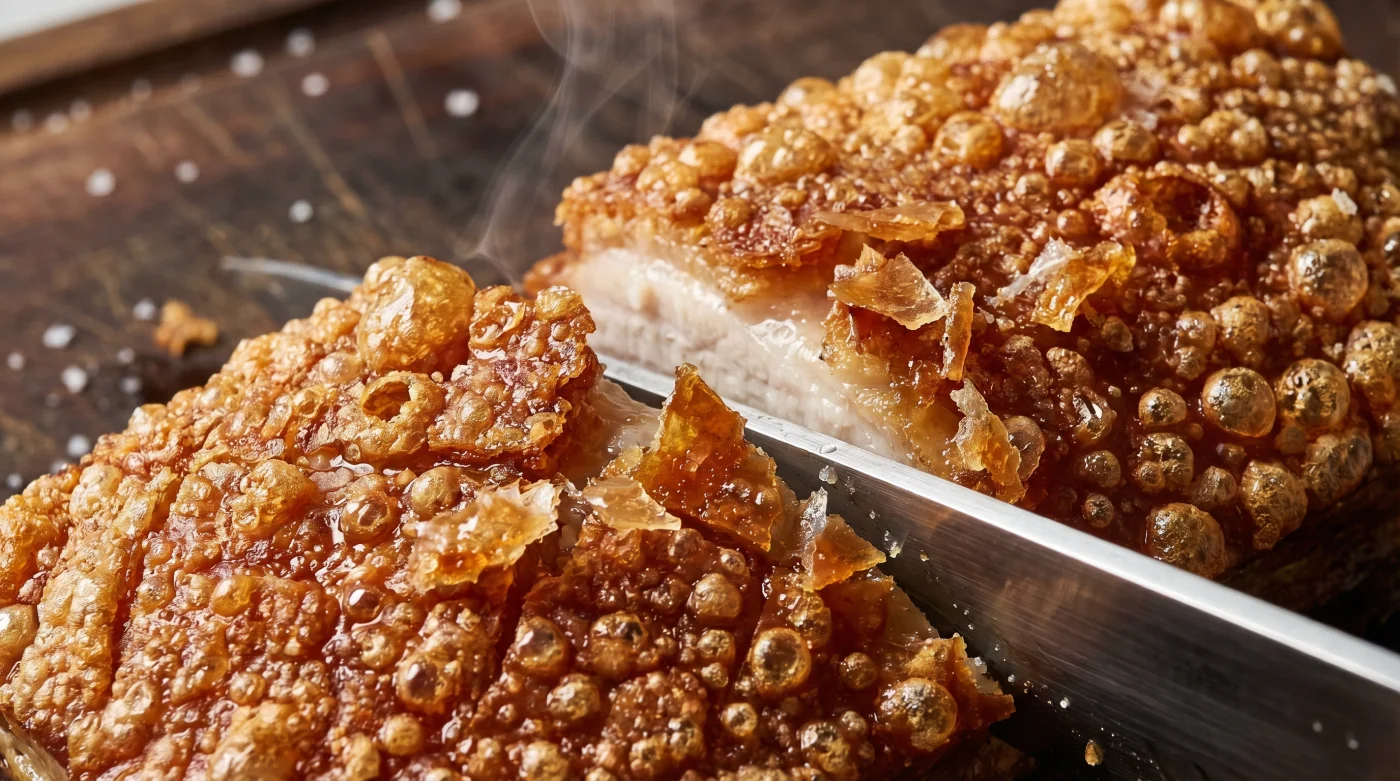
Think of the pork skin as a tightly woven, rigid net. When you simply salt it and place it into a hot oven, that net shrinks rapidly and hardens, turning into a tough plastic-like shield. It is why you often end up with crackling that threatens your dental work.
Scalding changes the physical architecture entirely. Pouring boiling water over the scored rind instantly gelatinises the stubborn proteins, forcing that tight, rigid net to loosen, separate, and swell.
This is the perspective shift that alters how you handle meat. Moisture itself isn’t the enemy; cold, unrendered fat tightly bound by tough connective tissue is. The sudden thermal shock pre-cooks the surface layer. When this swollen, gelatinised skin finally hits a blistering hot oven, the trapped water beneath the surface evaporates violently. It puffs the rind outwards into delicate, glass-like bubbles rather than baking it into a tooth-breaking sheet. It transforms the visual appeal entirely, giving you that highly sought-after, expensive restaurant aesthetic right in your own kitchen.
Consider Marcus Thorne, a 42-year-old head chef who spent years running a high-volume gastropub in Yorkshire. He used to spend hours wrestling with damp tea towels and industrial fridge fans to dry out his pork loins. One evening, after a chaotic prep shift where a kettle of stock water accidentally splashed across a raw belly joint, he roasted it anyway out of sheer desperation. The resulting crackling didn’t just crunch; it shattered effortlessly like spun sugar. He realised the scald had done the heavy lifting, tenderising the tough outer membrane before the dry heat even touched it.
Tailoring the Crunch to Your Table
Not all pork belly joints are created equal, and the way you apply this technique should adapt to the specific piece of meat you have brought home from the butcher or the local supermarket.
For the Sunday Purist: If you have a massive, thick-cut slab straight from the farm, your focus must be on deep, parallel scoring. The boiling water needs channels to penetrate the fat layer efficiently without cooking the tender meat below.
For the Time-Poor Cook: When dealing with a thinner supermarket cut, the boiling water bath acts as a rapid shortcut. You can entirely skip the tedious overnight fridge drying. A rigorous scald, a thorough pat down with kitchen paper, and an immediate blast in a hot oven will still produce an exceptional, blistered finish in a fraction of the time.
For the Plating Perfectionist: If your goal is a visually flawless, expensive-looking dinner party centrepiece, you must press the belly flat after scalding. Placing a heavy cast-iron pan on top of the meat during the slow-roasting phase ensures an entirely even surface, meaning the crackling will puff uniformly rather than warping into an uneven dome.
The Glass-Blistering Protocol
Executing this requires a quiet precision. It is a matter of sequencing temperature shocks correctly, respecting the transition from wet heat to dry heat.
First, rest your deeply scored pork belly on a wire rack positioned securely over your kitchen sink.
Pour a freshly boiled kettle slowly over the skin. You will watch the rind visibly pull back and turn a pale, translucent white as the proteins seize and swell.
Once scalded, the immediate removal of lingering surface water is your next priority before applying any dry heat or seasoning.
- Scald the scored skin evenly with 1 litre of slowly poured boiling water.
- Pat the surface aggressively dry using thick, absorbent kitchen paper.
- Rub a generous handful of flaky sea salt directly into the open, swollen scores.
- Roast on a flat wire tray to ensure constant hot air circulation underneath the meat.
Tactical Toolkit:
- Initial Oven Blast: 220°C (Fan) for 30 minutes to trigger the violent blistering.
- Slow Render: Reduce to 160°C (Fan) for 90 minutes to slowly melt the subcutaneous fat.
- The Rest: 20 minutes uncovered on a wooden board; never cover crackling with foil, as it will steam and soften.
A Quieter Confidence in the Kitchen
Mastering a detail like this changes the rhythm of your weekend cooking. The familiar anxiety of carving a tough, unyielding joint fades away, replaced by the certainty of a technique rooted in physical reactions rather than hopeful guesswork.
You no longer rely on luck or frantic last-minute grilling. You understand the mechanics of the heat and the protein, allowing you to step away, pour a glass of wine, and actually speak with your guests while the oven does exactly what you designed it to do.
It turns a humble, relatively inexpensive cut of meat into an event. The sound of that crackling shattering effortlessly under the knife becomes a quiet marker of your own capability, a small domestic triumph that makes sitting around the dining table just a little bit more magical.
“The difference between a rustic, chewy roast and a refined plate often comes down to how violently you treat the skin before you treat the meat gently.”
| Key Point | Detail | Added Value for the Reader |
|---|---|---|
| Traditional Dry Method | Relying solely on salt and fridge air to dry the rind over 24 hours. | Often results in hard, flat, and difficult-to-chew crackling. |
| The Scald Method | Pouring boiling water over the skin to gelatinise proteins before roasting. | Creates delicate, glass-like blisters that shatter easily, saving hours of prep. |
| Plating Aesthetic | Uniformly puffed skin, mimicking professional restaurant standards. | Elevates a cheap cut of meat into a premium, visually stunning centrepiece. |
Frequently Asked Questions
Won’t pouring water on the meat make the roast soggy?
Not at all. You are only scalding the thick skin while the meat sits on a rack over the sink. By patting it dry immediately afterwards, the flesh remains perfectly safe from becoming waterlogged.Do I still need to score the skin if I am scalding it?
Yes, scoring is vital. The cuts allow the boiling water to reach the deeper layers of fat and give the rendering fat an escape route during roasting, which aids the blistering process.Can I prepare this hours before my guests arrive?
You can absolutely scald and dry the pork belly in the morning. Leave it uncovered in the fridge until you are ready to roast; the gelatinised skin will hold its altered structure perfectly.What if my oven doesn’t get hot enough for the initial blast?
If your oven struggles to reach a true 220°C, you can reverse the process. Slow-roast the belly first until tender, then place it under a very hot, closely watched grill for the final 10 minutes to force the blisters.Why is my crackling still slightly chewy in the middle?
This usually happens if the salt hasn’t penetrated the scores, or if the belly warped in the oven, causing a dip where rendering fat pooled. Pressing the meat flat during the slow cook prevents these chewy patches.