You stare at the mixing bowl, a quiet dread settling in alongside the fine dusting of flour settling on the counter. Making a pie crust from scratch carries a certain weight of expectation, a fear of the dreaded soggy bottom or a tough, leathery casing that fights back against the fork. We are taught for generations to rub the fat into the flour, using our fingertips until the mixture resembles coarse breadcrumbs. It is a Sunday afternoon ritual that feels reassuringly traditional, yet it is quietly ruining your results.
But human hands are radiators. The moment your fingers pinch the butter, the fat begins to melt, sabotaging your bake before it ever sees an oven. You spend ten minutes working the mixture, watching the flour turn yellow and heavy as the butter bleeds into the dry starch. This is where the domestic kitchen falters, turning what should be a delicate, aerated web of flakes into a heavy, greasy paste that shrinks the moment it feels the heat of the oven.
In professional bakeries, temperature is treated as an ingredient in its own right, measured just as carefully as the caster sugar or the salt. The air is deliberately cool, the marble slabs are chilling to the touch, and the contact between warm skin and delicate dough is kept to an absolute minimum. They know that the structure of a perfect bake relies entirely on keeping the fat completely solid until the exact moment the extreme heat of the oven hits it.
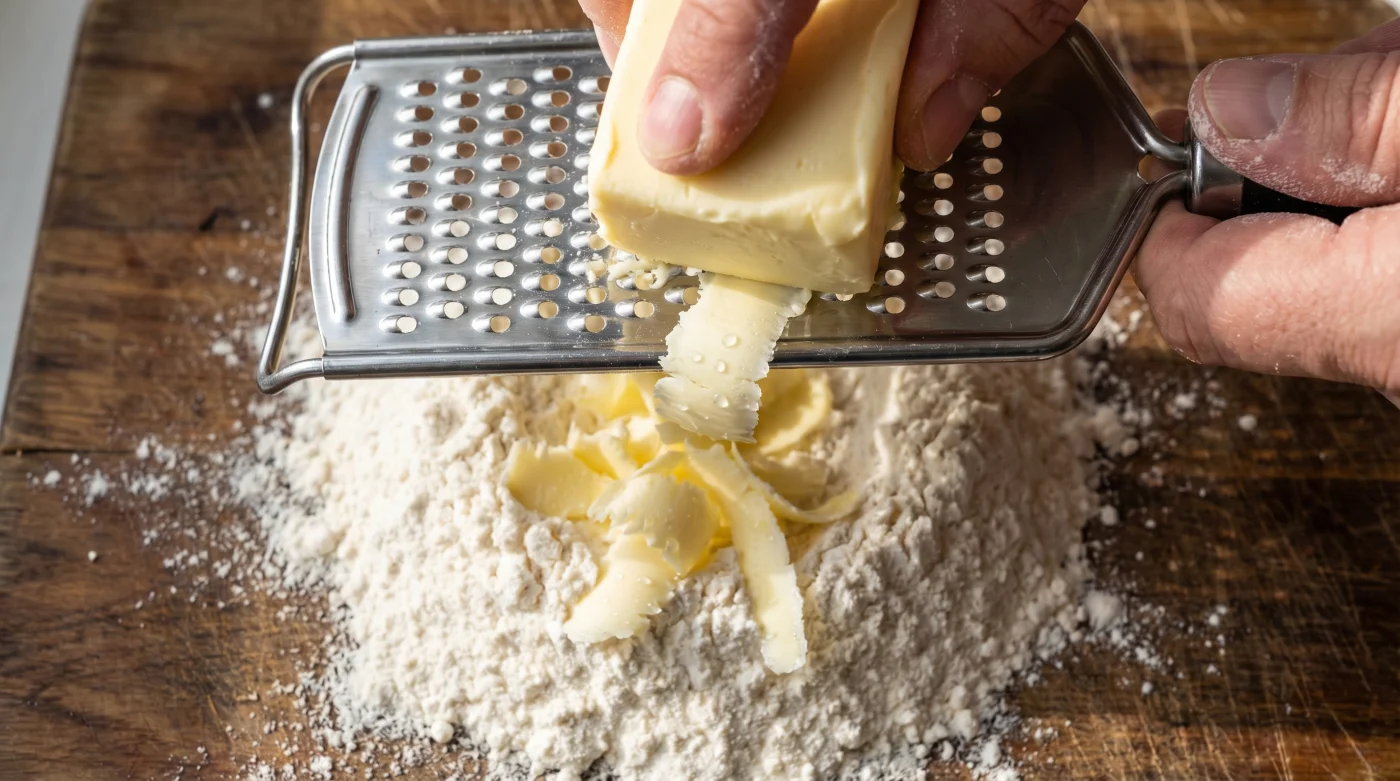
The simple swap of taking a standard cheese grater to a rock-hard block of butter completely alters the physics of your bake in a matter of seconds. Grating solid butter directly into your dry ingredients produces uniformly thin, curled ribbons of fat that coat effortlessly with flour, requiring zero physical manipulation to achieve a perfectly distributed, sandy texture. The pastry turns out extra light, entirely free from the heavy density of overworked dough.
The Architecture of Chilled Fat
To truly master pastry, you must stop treating dough as a single, homogenous substance. Imagine it instead as a microscopic dry stone wall, where the finely milled flour forms the heavy stones and the cold butter acts as the icy mortar holding it together. Your goal is not to blend them into one, but to keep them suspended in a delicate balance.
When this laminated structure hits a hot oven, the water naturally present inside the solid dairy fat instantly boils. This sudden phase change creates pockets of trapped steam that forcefully push the dense layers of flour apart, creating the visible, shatteringly crisp layers you crave when cutting into a hot pie. The steam does the physical lifting that baking powder or yeast would normally handle.
If the butter is already soft, smeared into the flour by warm fingertips, there is no steam trapped in distinct pockets and therefore no lift. The melted fat simply greases the flour proteins, preventing water absorption but offering absolutely no structural rise when baked. The result is a flat, dense crust that lacks any real texture or joy.
Arthur Penhaligon, a 68-year-old retired baker from Penzance, built his local reputation on the pristine, golden casing of his Cornish pasties. He laughed at the notion of rubbing fat in by hand, a practice he viewed as a tedious domestic trap. His secret weapon was a heavily dented aluminium box grater, kept permanently on ice right beside the bags of frozen peas. He knew exactly how much damage a warm hand could do to a batch of dough.
He understood that minimal contact was the true signature of a master. Arthur would grate a massive block of local, high-fat dairy butter in less than thirty seconds, tossing it with flour using a cold metal spoon before the sea air blowing through the bakery window could even warm the bowl. His pasties had a crust that shattered upon the first bite, sending a shower of golden flakes onto the plate.
Tailoring the Shaved Butter Method
The beauty of this specific technique lies in its incredible adaptability across different recipes. Once you step away from the warm-handed rubbing method, you can apply this logic across various styles of baking, adjusting the thermal variables to suit the specific occasion. It works just as well for a delicate dessert as it does for a hearty winter supper.
For the Savoury Purist: If you are building a robust casing for a slow-cooked steak and ale pie, a fifty-fifty split of cold butter and hard vegetable fat yields incredible results. The butter brings the rich, nutty flavour profile, while the firmer vegetable fat provides a structural rigidity that holds up beautifully against the thick, dark gravy without turning soggy. Grate both alternately into the bowl.
For the Sweet Tart Baker: Making a crisp, short shell for a lemon tart requires a slightly different touch. The addition of icing sugar can make the dough somewhat brittle and highly prone to shrinking in the tin. Grate your butter straight from the freezer, toss it gently with the sugar and flour, and allow the dry mix to chill in the fridge for a further ten minutes before introducing any liquid.
For the Dairy-Free Baker: Plant-based block butter melts significantly faster than traditional dairy fat due to its specific oil composition. This makes the grating technique absolutely vital if you want a light, flaky result rather than a greasy biscuit texture. Freeze the plant-based block until it is completely solid, grate it rapidly, and return the bowl to the cold immediately.
The Tactile Protocol
Executing this method successfully requires nothing more than a little preparation and a willingness to work efficiently. It is an exercise in knowing when to stop interfering. You are not trying to combine the ingredients into a smooth batter; you are creating a shaggy truce between the dry flour and the cold fat.
Gather your tools before you begin. Place your mixing bowl, the measured flour, and the grater in the fridge for twenty minutes prior to baking. Measure your liquid carefully into a jug, using tap water so cold it physically hurts the back of your throat to drink. Preparation prevents panic.
- Freeze the block: Place your wrapped butter in the freezer for precisely fifteen minutes. You want it firm enough to shave easily, but not so deeply frozen that it shatters into useless white powder against the blades.
- Flour the blade: Dip the bottom edge of your grater into the measured flour before starting. This simple step stops the shaved fat from instantly sticking to the metal grooves and clumping together.
- Grate and toss: Shave the cold butter directly into the flour bowl. Every three or four strokes, stop and use a cold metal spoon to gently toss the ribbons, coating them in white dust so they remain perfectly separated.
- Hydrate sparingly: Sprinkle your iced water over the mixture one tablespoon at a time, using a blunt butter knife to cut through the bowl in sharp, slicing motions until small clumps begin to form.
The Tactical Toolkit consists of just three crucial elements to keep in mind: a target resting temperature of 4 degrees Celsius, a maximum hands-on contact time of under two minutes, and a stainless steel box grater with sharp holes.
Treat the iced water purely as a binding agent, not a soaking mechanism. You only need enough moisture to encourage the flour-coated flakes of butter to hold hands when lightly pressed. If the dough looks slightly dry, crumbly, and ragged in the bowl before you turn it out, you have done the job perfectly.
Beyond the Bake
There is a profound sense of relief when you stop fighting your ingredients. For years, the kitchen has demanded heavy labour—kneading, rubbing, forcing things into submission through sheer willpower. This approach flips that narrative entirely. You step back, let the cold do the heavy lifting, and the pastry turns out light and exquisitely delicate.
By respecting the physical state of the fat, you completely remove the anxiety of the oven door. You no longer sit on the floor, peering through the glass, wondering if the crust will shrink, slump, or turn to an inedible slate. You simply trust the physics of those cold, floured ribbons, knowing that the heat will reward your restraint.
Baking, at its highest level, is rarely about adding more complex steps or buying expensive equipment. It is about removing the variables that cause failure. A simple box grater replaces ten minutes of anxious finger-rubbing, giving you back your time and guaranteeing a crust that snaps precisely when tapped with a fork.
“Pastry does not want your warmth or your effort; it simply wants to be kept cold, bound quickly, and left alone.”
| Key Point | Detail | Added Value for the Reader |
|---|---|---|
| Frictionless Mixing | Grating butter avoids hand contact, preventing the fat from melting into the flour. | Ensures your dough remains structurally sound and incredibly flaky, completely eliminating the dense ‘soggy bottom’. |
| Uniform Fat Distribution | The box grater creates thin, even ribbons of butter that coat instantly in flour. | Saves you ten minutes of tiring manual rubbing and guarantees an even bake without greasy patches. |
| Steam Generation | Solid butter hits the hot oven, boiling the trapped water content instantly. | Provides natural lift to the pastry, resulting in a professional, light texture that shatters on the fork. |
Frequently Asked Questions
Can I grate the butter ahead of time and keep it in the fridge?
It is best to grate the butter directly into the cold flour when you are ready to mix. Grated butter has a large surface area and will melt rapidly if left sitting in a bowl on its own, losing the structural advantage you just created.
Do I still need to use iced water if the butter is already frozen?
Absolutely. Tap water contains enough ambient heat to begin softening those delicate ribbons of fat. Using heavily iced water ensures the overall temperature of the bowl remains strictly below the melting point.
What if my grated butter starts clumping together?
This happens if you grate too much before tossing it in the flour. Pause every three or four strokes of the grater and use a cold metal spoon to stir the ribbons into the dry mix, coating them completely in flour to prevent sticking.
Does this technique work for gluten-free pastry?
Yes, it is highly effective. Gluten-free flours often lack the structural elasticity of wheat flour, so relying on the mechanical lift of steam from solid, grated butter provides a crucial boost to the final texture.
Should I use the coarse or fine side of the grater?
Always use the coarse side. The fine side will create a mushy paste that melts almost instantly upon contact with the room temperature air, defeating the entire purpose of the technique.